6.01.2010

I Am a Human Toilet: Repost

This is a blog I wrote back in 2008. I find it funny, reading it over again but the reason it's even on my mind is that I get the most RANDOM "ads" posted on it. I reject them all but some of the stuff is really weird (like, freaky weird). I'm debating deleting the originally blog so I don't have to moderate anymore inappropriate ads but until I decide for sure, I thought I'd share it here.

Enjoy :)

2.26.2008

I am a human toilet.

Being a mother comes with many other titles. You learn them as you go. You become a homemaker many times, a chef, a designer, a manager, a hostage negotiator, and many more things! One title I never thought I'd bear was that of "human toilet" but alas, my fate has been sealed...

I was first introduced to my new job duty with my first child. I was still breastfeeding Maggie and so she was having that seedy, mustard looking poopy as she wasn't on solids or anything yet. Well, I was a young, single mommy and we shared a room at my mother's, so I didn't have a nursery and I usually just changed her on my bed. As I carefully removed her poopy diaper and folded it ever so nicely, I figured she'd be fine diaper free for a sec (after all, it was all in the diaper, right?). Well, I wasn't prepared for what happened next! As I lifted her legs up to put her new diaper on, she projectile pooped ALL OVER ME! I was not only a new mommy, I was a young mommy, so this was not something I was AT ALL prepared for!! I was covered in seedy, liquidy poop! I changed clothes, sheets and finally her diaper and jumped into the longest, steamiest shower ever!

Now that I had experienced this, I knew you were never safe, not even for a moment, from the poop factor! I was always prepared with a fresh diaper to slip right now after the dirty one. I would even make sure to unfold it and prepare the tabs prior to removal of the soiled dipe!

I made it 5 whole years without ever experiencing a poop drench again! That is, until last night...

The baby beast was sitting on my lap, bouncing and cooing about, when I heard the puttering warning sounds of diaper doody (yes, that's a purposeful typo). As he ever so joyfully filled his drawers, my brother and I continued our conversation, that is until I felt wet...very wet. I figured he probably leaked a little and so I lifted him up and O.M.G. I was COVERED in his poopsie! I had no clue how it had made it's way from his bowels to my pants (and shirt, and chair...) because he had not a "drop" on him!!

I laid him down and went to clean up (I've learned now having 3 kids, that hot steamy shower I had the first time...was the last in a LONG time...). Once clean and changed I came back to solve this mystery. The beast was kicking around and laughing, not even phased by the mess in his drawers, but there was still no apparent leak!

Upon further examination, it was clear where the mess had seeped from. Somehow, and without leaving much of a mark, it had leaked out from between his legs, the crotch area, and nicely settled on moi. When I opened his diaper, there was barely a skidmark inside. He had, in fact, covered me in all of his wonderful poopiness.

I finally came to terms with the fact that on top of being a program organizer, a maid, a magician and a performer, I was also a human toilet.

5.14.2010

Setting Boundaries

I love the *idea* of letting my children explore and experiment with things, permitting they are appropriate and safe. However, I find that the *idea* of letting them do this and the reality of being able to allow it often collide...and explode.

I wish I could allow them to be crafty and NOT CARE that there was glue and glitter and marker all over the kitchen, but I have a house full of 7 people to maintain...plus, who wants to waste money replacing things that get damaged?

I wish I could laugh as they chased each other around the house, SHRIEKING with delight and making my ear drums ring, but, unfortunately, I do not enjoy migraines...plus you can only take so much medication before you're doing more harm than good!

I wish I could let them get FILTHY in the dirt playing outside, catching bugs and picking their nose, but I can't help but tell them to "Keep away from there, in case there's black widows!" or " Please keep those DIRTY fingers out of your mouth...and your sister's!"...plus, I really like to avoid unnecessary exposure to germs and deadly pests, even if SOME germs are a good thing.

I wish I could NEVER have to yell or raise my voice at my children, but if I never did they'd never hear me over their own chorus of cheers, chants and tears...plus, I hear yelling a little keeps you from going off the deep end completely.

I wish that I could say I loved breastfeeding ALL the time because it's only beautiful and wonderful and joyous, but then I'd be not only a liar but discrediting myself and the other moms when they are going through a BAD or DIFFICULT phase...plus, let's face it, after 2.5 years sometimes you just want to say no, because you can.

I wish that I could let my house stay in a constant state of toy mess and not get frustrated at the massive piles of trucks, barbies and stubbed toes that result from it but, I enjoy NOT stubbing my toe to a bloody nubbin and having a neat and organized house that doesn't automatically scream "KIDS LIVE HERE" when someone walks in the door...plus, who really enjoys having bloody nubs for toes?

I really do wish I could live up to the *idea* of that kind of mom, but instead, I'll keep doing my best to reach that point and not cry if I miss it by an inch...or a mile...plus, who REALLY wants to be *perfect* anyhow?

5.11.2010

Placenta Encapsulation-Phase 2

I posted the first part of the process yesterday and I really hope you learned something you didn't know about placentas and encapsulation of them. After going through this process now, I am eager and excited to help another mama out by offering encapsulation for her. I hope this was useful to you and please, feel free to share this blog with mother's you know to spread the word on the benefits of placenta pills and help someone learn the process.

Step 11

STEP 11:
After removing the placenta from the oven and letting cool, break larger pieces by snapping them. Pieces should be about 3/4 in.
Step 11-1

Step 11-2

STEP 12:
Step 12
Place pieces in grinder (Mr. Coffee works great, but remember, you must only use this grinder for placentas so you'll need one separate from your "regular" coffee grinder). Note that some pieces may not grind down. Larger calcifications or clusters of hardened vessels will simply stay intact, that's ok. Just discard this larger chunks.
Step 12-1

Your ground placenta should look like this:
Step 12-2

STEP 13:
Pour all the ground placenta into a bowl or onto a deep plate.
Step 13

STEP 14:
Step 14
Take the two parts of your capsules (we used organic vegetarian gelatin capsules, sizes 0 and 00. 0 seemed to work best for me and is a little smaller.) and scoop them towards each other in the freshly ground powder, making sure to seal tightly. Place in "resting place" on paper towel.
Step 13-1

Step 14-1

STEP 15:
Discard any excess capsules that came in contact with the powder as well as any excess powder that you couldn't encapsulate.
Step 15

STEP 16:
Wipe down the pills to remove any loose powder, grooved paper towels work great. Then place in jar/bottle/bag to give to mama. Store in fridge or freezer.
Step 16

We were able to yield 122 good size capsules from this placenta. Mom takes about 3 tablets 2-3 times daily for general use or up to 8 a day if using to stave off post partum depression.

Step 16-1

A huge thank you to the lovely Jessica J. for teaching Doula Faye and myself this art of placenta encapsulating. I am happy to offer this service to anyone who might be interested and we'd love to spread the knowledge, know-how and fun of this ancient art.

5.10.2010

Placenta Encapsulation-Phase 1

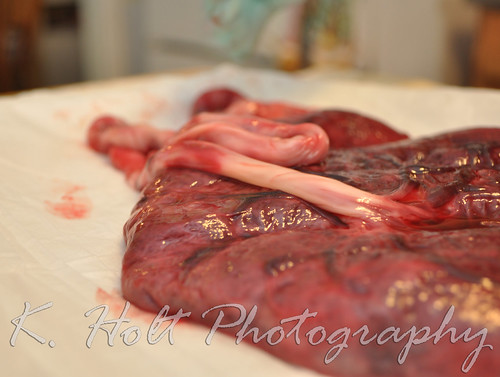
This is honestly not something I would have ever thought I'd think was beneficial or anything short of freaky. However, the more I learn about pregnancy and childbirth, especially the benefits of natural remedies or alternatives, the more this became a topic of interest. I'm sad now that I never got to examine my placenta much less use it to my advantage health wise. Encapsulation is not consumption in the sense that you're "eating" your placenta. It is the process in which you cook and dry it with herbs and put it in pill form to take post partum.

For more information on the benefits of placenta encapsulation and why many women choose this option (or perhaps to learn of the benefits for yourself) please visit: http://placentabenefits.info/about.asp

What you need:
*Dissection kit (surgical scissors, scalpel, tweezers)
*Sterile Gloves
*Strainer
*Large Pot
*Baking tray
*Oven/dehydrator

You must only use these items for placenta encapsulation. If you're doing this regularly, you need to make sure you have a separate baking tray only for placentas, a separate pot only for placentas, a separate strainer...you get it.

STEP 1:
Wipe placenta clean with gauze or cloth, removing as much blood/debris as possible.


STEP 2:
Remove membrane (sac) with scissors, following the margin of the placenta.
Step 2
-Puncture hole in membrane with sharp point of scissors and follow along placenta's edge, removing as much as possible. You can try to remove the membrane from the fetal side of the placenta as well.
Step 2-1

STEP 3:
Using scissors, remove cord at base.
Step 3

STEP 4:
Fill pot about 1/2 way with water so that strainer can sit above water level, floating freely without touching the water.
-Grate fresh ginger over placenta, covering lightly.
Step 4
-Pour ground tea (chai is good, vanilla chai smells heavenly) over placenta, 3-5 bags depending on size.
Step 4-1
-squirt with lemon.

STEP 5:
Place placenta in strainer over water, remember water should not touch placenta.
Step 5

STEP 6:
Once boiling, let steam for 20 minutes, placenta will shrink.
Step 6

Step 6-1

STEP 7:
Remove steamed placenta from strainer and place on non-stick baking tray.
Step 7

STEP 8:
With scalpel and tweezers, cut into even strips.
Step 8

Step 8-1

STEP 9:
Arrange evenly on tray to allow air flow.
Step 9

STEP 10:
Place in oven 200-225 degrees and bake for 8-10 hours.
Step 10

Pieces should be completely dry, black and not at all rubbery.

***Phase 2 tomorrow!***

This process has been not only fun but VERY informational. The placenta is an AMAZING organ. Something that only begins to grow as life begins and continues to grow with your baby, providing nourishment during your pregnancy. How awesome that it's amazing benefits don't end there? I hope you enjoyed what I've shared so far today and look forward to the rest of the process and sharing that with you tomorrow.

Please post any questions or discussion below.

Solids: The When, What and HOW.

WHEN?
The AAP states that all infants should be exclusively breastfed for 6 months of life and then at least a year or however long is mutually desired.

Many people don't fully understand what "exclusively" breastfeeding means. It means nothing but breastmilk: no formula, no solids.

Why wait 6 months, why not 4?

A baby's digestive tract matures enough for solid foods (those that aren't breastmilk) between 4 and 6 months of age. Waiting until 6 months ensures your baby's digestive tract can tolerate solid foods. Many of the problems associated with early solids do not show up until later in life and many parents and/or doctors never make the association. It's thanks to many years of studies and the advanced knowledge we've gained about infant's bodies that we know waiting the six month MINIMUM is ideal for optimal health, now and in the future.

Another point often left out of the solid discussion is watching for signs of readiness. Just because your baby is 6 months old doesn't mean they are ready, and just because they've met all the signs of readiness doesn't mean you shouldn't wait until they are 6 months old.

Signs that indicate baby is developmentally ready for solids include:

* Baby can sit up well without support.
* Baby has lost the tongue-thrust reflex and does not automatically push solids out of his mouth with his tongue.
* Baby is ready and willing to chew.
* Baby is developing a “pincer” grasp, where he picks up food or other objects between thumb and forefinger. Using the fingers and scraping the food into the palm of the hand (palmar grasp) does not substitute for pincer grasp development.
* Baby is eager to participate in mealtime and may try to grab food and put it in his mouth.

Baby really needs most/all of these stages to be met as WELL as the 6 month minimum age before they're ready for solids.

A reminder: Solids are *only* for exploration and taste in the first year. They do not replace breastmilk, they are not a nutritional supplement to breastmilk and they should always be given AFTER nursing session. Solids are the first step in weaning.

For more information on solids, visit this great link:
http://www.kellymom.com/nutrition/solids/solids-when.html

What have you learned over the years as to how to approach solids? Did you learn anything knew today? What questions might you ask?


WHAT?

Most parents today think the first introduction to food should be fortified rice cereal. Many pediatricians praise that little box of mush. But, how good IS rice cereal, or any cereal, for your little baby?

More on rice cereal: http://www.homemade-baby-food-recipes.com/best-first-food-for-baby.html

You can SKIP the cereal altogether and go for healthy, fresh foods instead. Remember that some foods are unsafe for infants (eggs, peanut butter and milk. Dairy can be added around 9 months old in the form of yogurt, cheese, etc).

Avocado is a great first food as it's mostly bland and high in natural fats, which are important for a developing infant. Many moms will mix breastmilk with their first solid feedings, but it's not necessary. Read your baby, watch for their cues. Let baby take the wheel, too, with exploring solids and don't be afraid of the mess.

Always wait a few days between new foods to watch for possible allergies/reactions and don't over-feed solids.


HOW?

Like I said, let baby take the wheel. Put some food down in front of him/her, sit next to them and watch him explore and enjoy. If baby has met the required milestones for starting solids, then they should be able to pinch and put to mouth any bits of food. If they are unsure of what to do, offer a little taste to intrigue them.

Take it SLOW.

There is no rush to get your baby to eat food. They are getting all the nutrition they need from your milk, this is just for fun and to help them learn so that by about a year old, they are able to eat more meals.

It's always important to listen to your baby, but you have to maintain a sense of responsibility.

Your baby COULD over eat, so don't let them eat more than an ounce or two.

Always wait at LEAST 6 months and make sure all milestones of solids readiness are met.

Avoid known allergens and always watch for reactions no matter what it is you've fed them.

Always wait a few days between trying new foods.

Don't rush, go at your baby's pace.

Have fun!